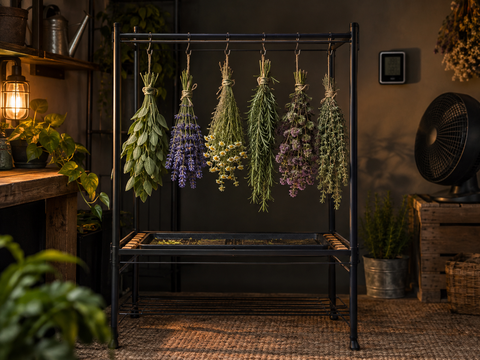
The short answer: dry your harvest in a dark, clean space with stable, moderate temperatures, controlled relative humidity and gentle indirect airflow. For many small, dense, aromatic harvests, a practical starting point is 60–65°F (16–18°C) and 55–60% relative humidity. Keep air moving around the room, but never aim a fan directly at hanging material.
Those numbers are a starting range—not a universal law. Crop type, branch size, density, local climate and the design of your drying space all affect the pace. The goal is a controlled, even dry that moves moisture from the center outward without trapping damp pockets or making the exterior brittle before the inside catches up.
Before harvest day, gather your drying supplies, install a dependable thermometer and hygrometer, and confirm that your fan setup can circulate air without blowing directly on the harvest.
Food-safety note: If you are preserving culinary herbs, produce or other edible crops, follow a tested crop-specific preservation method. Drying-room guidance for aromatic flowering material does not replace food-safety instructions.
Why Drying Conditions Matter
Freshly cut plant material contains substantial moisture. After harvest, that moisture keeps moving from the interior of stems and flowers toward the surface. Temperature, relative humidity and airflow determine how quickly the surrounding air can accept and carry it away.
If conditions are too warm, too dry or too windy, the surface can dry rapidly while the center remains moist. If conditions are too cool, stagnant or humid, drying slows and the risk of musty odors and microbial growth rises. A stable environment gives moisture time to equalize throughout the material.
Practical Starting Targets
Use these ranges as an initial setup, then adjust based on your crop and daily observations.
|
Control |
Starting point |
What to watch |
|
Temperature |
60–65°F (16–18°C) |
Stability matters more than chasing one exact number. Avoid heat spikes. |
|
Relative humidity |
55–60% RH |
Watch for persistent highs, rapid surface crisping and wet pockets in dense material. |
|
Airflow |
Gentle, continuous and indirect |
Leaves should not flutter hard. Air should exchange throughout the space. |
|
Light |
Dark or very low light |
Avoid direct sunlight and unnecessary heat. |
|
Typical duration |
Often 7–14 days |
Dense branches or cool conditions may take closer to 2–3 weeks. Follow the material, not the calendar. |
The Three Controls
Temperature: Keep It Moderate and Steady
Published cannabis post-harvest research describes conventional drying temperatures in a broad range of roughly 59–70°F (15–21°C). For a home or small commercial drying space, beginning near the lower-middle of that range can support a slower dry without requiring unusually cold conditions.
Avoid placing the harvest beside heaters, dehumidifier exhaust, hot equipment or sun-warmed walls. Record the high and low temperatures every day. A room that averages 63°F but spikes to 78°F each afternoon is not truly stable.
Humidity: Control the Pace
Relative humidity tells you how saturated the air is at the current temperature. Near 55–60% RH is a useful starting zone for many dense, aromatic harvests. In the first day or two, freshly cut material may push room humidity upward quickly, especially in a small tent or closet.
Place at least one calibrated hygrometer at canopy or hanging height, away from a humidifier, dehumidifier outlet or direct fan stream. In a larger room, a second sensor on the opposite side can reveal hidden pockets.
If RH remains above the mid-60s, inspect dense areas, increase room air exchange or moisture removal, and avoid packing material too closely. If RH falls below about 50% and exteriors become crisp within a day or two, reduce direct air movement and consider gentler environmental correction. Make small changes and allow the room time to respond.
Airflow: Move the Air, Not the Harvest
Airflow prevents a humid boundary layer from lingering around each branch, but too much air can create an uneven dry. The right pattern is gentle circulation around and between hanging material, combined with enough exhaust or fresh-air exchange to keep temperature and humidity from drifting.
Position one or more circulation fans so air glances off a wall or passes beneath the hanging zone. Do not point a strong fan directly at flowers or leaves. If the material is whipping, fluttering continuously or drying noticeably faster on one side, redirect or reduce the airflow.
Prepare the Drying Space Before Harvest
· Clean and sanitize the room, racks, trays, tools and nearby surfaces.
· Block direct light and eliminate heat sources.
· Test your hygrometer against a known reference and confirm that sensors agree reasonably well.
· Run the space empty for 12–24 hours to see whether temperature and RH remain stable.
· Arrange hanging lines or racks with room for air to pass between pieces.
· Check that intake, exhaust and circulation equipment can operate continuously and safely.
Finish major cuts with clean harvest trimming supplies, but choose wet trimming or dry trimming based on plant density, local humidity and your preferred workflow. Removing more leaf material can speed drying; leaving branches and some leaf material intact can slow it.
A Step-by-Step Drying Process
1. Harvest clean material. Inspect carefully and exclude anything with visible mold, rot, pest contamination or an off odor.
2. Choose branch size deliberately. Smaller pieces dry faster; larger branches hold moisture longer and can slow the process.
3. Space the harvest. Hang or rack material so pieces do not press together. Dense contact points are slow to release moisture.
4. Stabilize the room. Bring temperature, RH and indirect airflow into range, then let the space settle before making another adjustment.
5. Log conditions twice daily. Record current, high and low readings plus any equipment changes. A simple log makes patterns much easier to see.
6. Rotate only when needed. If one zone consistently runs wetter or dries faster, correct the airflow pattern and rotate positions gently.
7. Inspect and smell. Look inside dense pieces, check contact points and investigate sour, musty or ammonia-like odors immediately.
8. Judge readiness by multiple signs. Use stem behavior, surface feel, internal moisture equalization and small test samples—not a single calendar date.
How to Know When the Harvest Is Dry
The familiar “small stems snap” test is useful, but it should not be the only test. Thin stems may snap before dense centers have equalized, while thick stems can remain flexible after smaller material is ready.
· The exterior feels dry rather than wet or spongy, but not brittle or powdery.
· Small stems bend and begin to crack; they do not fold like fresh green material.
· A sample placed in a sealed container with a reliable hygrometer does not produce a rapid humidity spike.
· The aroma is clean and plant-like, with no musty, sour or ammonia-like note.
· Pieces from different locations in the room feel reasonably consistent.
If a closed-container test climbs sharply, return the material to the drying environment and reassess. Never seal material that still has damp centers; trapped moisture can create localized conditions favorable to mold.
Troubleshooting Common Drying Problems
|
What you notice |
Likely cause |
What to do |
|
Outside turns crisp very quickly |
Air too dry, temperature too high or direct fan exposure |
Redirect the fan, lower heat and make small RH corrections. |
|
RH stays above the mid-60s |
Too much wet material, weak exhaust or moisture removal |
Increase spacing and air exchange; inspect dense areas frequently. |
|
One side dries faster |
Uneven circulation or equipment outlet aimed at the harvest |
Reposition airflow and rotate locations only after correcting the pattern. |
|
Musty, sour or ammonia-like odor |
Moisture trapped in dense material or microbial activity |
Isolate and inspect immediately. Discard contaminated material and sanitize affected surfaces. |
|
Conditions swing day to night |
Equipment cycles too aggressively or room climate influences the space |
Use smaller adjustments, improve environmental control and review high/low logs. |
Moving From Drying to Storage
Once the harvest is evenly dry, transfer it to clean, appropriately sized containers. Do not overfill. Leave enough room to move and inspect the material, and continue monitoring the container environment during the first several days.
Choose clean, light-protective harvest storage supplies and label containers with the crop, harvest date and storage date. If humidity rebounds rapidly after sealing, reopen the container and return the material to controlled drying.
Frequently Asked Questions
What temperature and humidity should I use to dry a harvest?
For many small, dense, aromatic harvests, start around 60–65°F (16–18°C) and 55–60% RH. Research and crop-specific practices span a wider range, so treat this as a starting point and adjust for plant density, branch size and your drying space.
Should a fan blow directly on a drying harvest?
No. A fan should circulate air around the space rather than blast the plant material. Direct airflow can overdry the exterior, create uneven results and make one side finish before the other.
How long does harvest drying take?
Seven to fourteen days is common in small controlled environments, but dense branches or cooler conditions can require closer to two or three weeks. Drying time is an observation, not a deadline. Use environmental logs and physical checks.
Can I dry a harvest in a grow tent?
Yes, if the tent can maintain darkness, stable temperature, controlled RH, gentle circulation and suitable exhaust. Avoid overcrowding, and place the hygrometer at hanging height instead of directly beside a humidifier, dehumidifier or fan.
What should I do if humidity spikes after harvest?
A short rise is normal as fresh material releases moisture. If RH remains high, increase spacing, air exchange or dehumidification gradually. Inspect dense areas and contact points, and do not rely on a fan aimed directly at the harvest as the solution.
How do I know the harvest is ready for storage?
Look for an evenly dry exterior, small stems that begin to crack, a clean aroma and a sealed test sample that does not show a rapid humidity rebound. If moisture climbs quickly after sealing, continue controlled drying.
Build a More Predictable Drying Setup
The best drying process is repeatable: prepare the space early, measure the environment, make small corrections and write down what happened. Your notes from this harvest become the starting recipe for the next one.
Set up your room with Garden Supply Guys harvest drying supplies, dependable hygrometers and correctly sized fans and blowers so you can monitor conditions and protect the work you put into the growing season.
Sources and Further Reading
Cultivar-Specific Drying Approaches for Medicinal Cannabis (2024): PMC / National Library of Medicine
Drying and curing herbs and flowers: University of Vermont Extension Agricultural Engineering