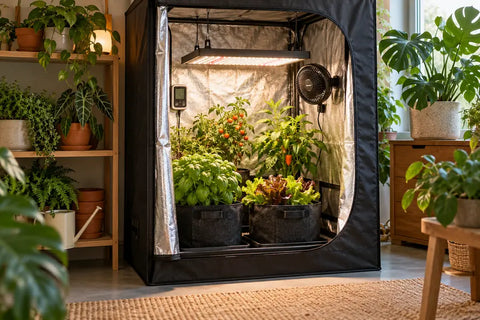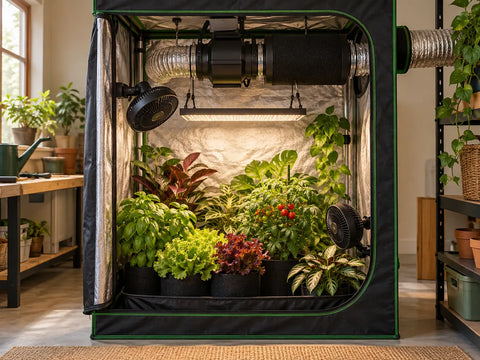
The short answer: use an inline fan to exchange the tent's warm, humid air, route that air through as little ducting resistance as practical, add a carbon filter when odor control is needed, and use clip fans to keep air moving gently around and through the canopy. Exhaust and circulation solve different problems, so a reliable setup usually needs both.
A well-planned ventilation system helps control heat and humidity, brings fresh air into the enclosure, and reduces stagnant pockets around dense foliage. It does not create a perfect climate by itself. The room supplying the tent must also provide air that is cool and dry enough to correct the conditions inside.
This guide explains how to calculate a starting airflow target, assemble the exhaust path, place circulation fans, check negative pressure, and tune the system after the plants fill the space.
Ventilation and Circulation Do Different Jobs
Ventilation replaces air. An inline exhaust fan pulls warm, humid air from the tent while fresh air enters through a lower intake. Circulation moves the air already inside the tent. Clip fans mix the upper and lower zones, move air between leaves, and reduce still pockets without changing the room's overall supply of fresh air.
|
Component |
Main job |
Common mistake |
|
Inline exhaust fan |
Moves stale air out and draws replacement air in |
Sizing only from the fan's unrestricted CFM rating |
|
Ducting and fittings |
Carry exhaust air to the room or discharge point |
Long runs, crushed duct, leaks, and sharp bends |
|
Carbon filter |
Captures odors as air passes through activated carbon |
Using a filter that is too restrictive or mismatched to the fan |
|
Clip fans |
Circulate air above, through, and below the canopy |
Pointing a strong, constant stream at one section of foliage |
|
Intake opening or fan |
Supplies replacement air near the lower part of the tent |
Restricting the intake until the exhaust fan struggles |
|
Sensor or controller |
Tracks temperature and humidity and adjusts equipment |
Placing the sensor in direct fan airflow, mist, or radiant light |
Step 1 Calculate a Starting Airflow Target
Start with the tent's interior volume:
Length x width x height = cubic feet
If you use one complete air exchange per minute as a planning baseline, the tent's cubic-foot volume is also its base CFM target. A 4 x 4 x 6.5-foot tent contains about 104 cubic feet, so 104 CFM is the theoretical starting point.
|
Example tent |
Approximate volume |
Base airflow at one exchange per minute |
|
2 x 2 x 6 feet |
24 cubic feet |
24 CFM |
|
2 x 4 x 6 feet |
48 cubic feet |
48 CFM |
|
3 x 3 x 6.5 feet |
59 cubic feet |
59 CFM |
|
4 x 4 x 6.5 feet |
104 cubic feet |
104 CFM |
|
5 x 5 x 6.5 feet |
163 cubic feet |
163 CFM |
Base CFM is not the fan size to buy. Carbon filters, duct length, bends, silencers, intake restrictions, and heat load all reduce delivered airflow. Select a fan that can meet the target after those losses. AC Infinity recommends additional capacity above the calculated minimum, especially when a filter is used, so the fan can run below maximum speed and still leave room for changing conditions. Consult the fan's performance information and the filter's rated airflow rather than relying on the largest number printed on a box.
Step 2 Match the Fan Filter and Duct Size
Choose an inline fan with enough usable airflow for the tent and use the same nominal diameter for the fan, filter, and main duct whenever possible. A 6-inch fan normally works most cleanly with a 6-inch filter and 6-inch duct. Reducers add resistance and another potential leak point.
Check the carbon filter's airflow rating before pairing it with a fan. The fan should not force more air through the filter than the filter is designed to handle. If the fan offers variable speed or automated control, extra capacity can be useful because it lets the system respond to warmer or more humid periods without running at full speed all day.
Step 3 Assemble the Exhaust Path High in the Tent
Warm air naturally collects near the top of the enclosure, so the exhaust pickup usually belongs high in the tent. A common inside-the-tent arrangement is:
Carbon filter -> inline fan -> duct -> discharge point
Hang the equipment from sturdy tent supports using the manufacturer's straps or mounts. Follow the airflow arrow on the fan housing. Keep the filter's prefilter sleeve installed and allow space around the filter so air can enter its full surface. If ceiling space is limited, the fan may be mounted outside the tent. Some systems can also push air through an external filter, but the filter and fan manufacturer should confirm that arrangement.
A carbon air filter is optional when odor control is unnecessary, but removing it changes resistance and may increase delivered airflow. Retune the fan after any major equipment change.
Step 4 Bring Fresh Air in Low
Open a screened passive intake near the bottom of the tent on the side opposite the exhaust path. The exhaust fan should pull fresh air across the growing area before it leaves at the top. Keep unused ports closed so air follows the planned route instead of taking a shortcut directly from an upper opening to the fan.
A slight inward pull on the tent walls usually indicates negative pressure. That helps keep unfiltered air and odors from leaking through seams. Extreme wall suction is not the goal. It can signal a restricted intake, an oversized fan setting, or a clogged filter. Open more intake area or reduce fan speed before adding an active intake fan. Large or heavily restricted tents may need powered intake, but its airflow should remain slightly lower than exhaust if negative pressure is desired.
Step 5 Place Clip Fans for Gentle Canopy Movement
Use clip-on fans to mix the air inside the enclosure. In many tents, one fan moves air across the upper canopy while a second fan circulates air below the foliage and around containers. An oscillating fan spreads air more evenly, but a carefully aimed fixed fan can work when it is not blasting one plant continuously.
Use the leaves as your indicator:
· Good airflow creates a light, intermittent flutter across much of the canopy.
· Too little airflow leaves corners still and allows humid pockets to form inside dense growth.
· Too much direct airflow makes leaves whip, curl, dry at the edges, or lean away from the fan.
As plants grow, raise or reposition the fans. A placement that works for seedlings may sit directly against mature foliage a few weeks later. Keep cords secured away from water and do not let leaves reach the fan guard.
Step 6 Route Ducting as Short and Straight as Practical
Select ventilation and ducting components that match the system diameter. Every foot of flexible duct, sharp turn, crushed section, and loose connection increases resistance. Use the shortest practical route, expand flexible duct fully, and replace tight 90-degree bends with gentler sweeps when the room allows.
· Secure connections with properly sized clamps.
· Seal small air leaks with foil HVAC tape where appropriate.
· Support long duct runs so they do not sag or collapse.
· Keep the discharge away from the tent's intake so warm, humid air is not immediately pulled back inside.
· Inspect the route before closing the tent; a kink hidden behind the enclosure can sharply reduce airflow.
Step 7 Place the Sensor Where the Plants Experience the Air
Place the temperature and humidity sensor near canopy height, shaded from direct grow-light radiation and outside the direct stream of a fan, humidifier, or dehumidifier. The sensor should measure the general plant zone rather than a specially hot, cool, wet, or dry pocket.
Check both lights-on and lights-off conditions. Temperature often falls after the lights turn off while relative humidity rises. A controller can maintain a low background fan speed, then increase exhaust when temperature or humidity passes the chosen limits. Settings should follow the crop, stage of growth, room conditions, and equipment instructions rather than one universal number.
Practical Layouts by Tent Size
|
Tent scale |
Exhaust and intake |
Circulation |
Main planning concern |
|
Compact tent |
High exhaust with short duct; one lower passive intake |
One small fan above or beside the canopy; add a lower fan if foliage becomes dense |
Avoid oversized equipment that consumes headroom |
|
Mid-size tent |
High filter and inline fan or fan outside the tent; generous lower intake area |
One fan above and one below the canopy is a useful starting layout |
Confirm airflow at the back corners and beneath the canopy |
|
Large tent |
Multiple intake paths or powered intake may be needed; keep exhaust routes balanced |
Use several circulation points rather than one high-speed fan |
Plan access aisles, sensor locations, and redundant monitoring |
These are layout patterns, not fixed equipment prescriptions. Plant density, lighting, room temperature, humidity, filter resistance, and duct routing can make two tents of the same size need different fan settings.
How to Tell When the Airflow Is Balanced
· The tent walls pull inward slightly when the door is closed.
· Temperature and humidity stay reasonably even from the front to the back and from the upper canopy to the lower zone.
· Most leaves move gently, but no section is being flattened by a constant stream.
· Warm exhaust air leaves the tent and does not immediately return through the intake.
· The fan can handle normal conditions below its maximum setting, leaving reserve capacity for warmer or more humid periods.
· Odor remains controlled when the system includes a correctly sized and maintained carbon filter.
Grow Tent Airflow Troubleshooting
|
Symptom |
Likely cause |
What to check |
|
Tent balloons outward |
Intake pressure exceeds exhaust or exhaust is off |
Reduce powered intake, increase exhaust, or check fan direction |
|
Tent walls pull in sharply |
Restricted intake, clogged filter, crushed duct, or high fan speed |
Open more intake area, inspect the air path, and reduce speed if conditions allow |
|
Upper tent stays hot |
Insufficient exhaust or exhaust pickup is too low |
Move the pickup higher, simplify ducting, or increase effective airflow |
|
Humidity spikes after lights off |
Cooler night air raises relative humidity and exchange is too low |
Maintain background exhaust and circulation; adjust controller settings |
|
Leaves whip or curl near a fan |
Direct air velocity is too high |
Lower the speed, increase distance, or aim the fan past the plants |
|
Back corners feel still |
Circulation does not reach the full canopy |
Reposition or add a low-speed clip fan |
|
Odor escapes the tent |
Loss of negative pressure, air leaks, exhausted carbon, or airflow mismatch |
Check pressure, seals, prefilter, filter age, and rated airflow |
|
Fan is loud with weak airflow |
Restrictive ducting, a dirty filter, or vibration transfer |
Straighten the route, clean components, and use secure vibration-isolating mounts |
Common Setup Mistakes
· Buying from free-air CFM alone. A fan moves less air after a filter, duct, and bends are attached.
· Using one fan for both jobs. An exhaust fan exchanges air, but it does not guarantee movement beneath a dense canopy.
· Exhausting into a small closed room. The tent can pull the same heat and moisture back through its intake.
· Creating a short circuit. An upper intake placed beside the exhaust allows fresh air to leave before it reaches the plants.
· Running clip fans too aggressively. Strong direct wind can damage foliage even when the tent temperature looks acceptable.
· Ignoring the dark period. Humidity can rise quickly after lights off, especially when plants are large or recently watered.
· Forgetting maintenance. A loaded prefilter, clogged carbon bed, dusty fan, or crushed duct can change performance over time.
Simple Maintenance Schedule
|
Interval |
Ventilation check |
|
Every few days |
Check temperature and humidity trends, leaf movement, intake openings, and tent pressure |
|
Weekly |
Inspect duct connections, fan guards, cords, filter prefilter, and the area around intake screens |
|
Monthly |
Remove dust from fan guards and accessible surfaces; confirm that sensors agree with a trusted monitor |
|
As performance changes |
Inspect for crushed duct, clogged intake screens, unusual noise, odor breakthrough, or reduced exhaust |
|
Between crop cycles |
Clean the tent and circulation fans, inspect hangers and clamps, and review the layout before the next canopy fills in |
Frequently Asked Questions
Do I need both an inline fan and clip fans
In most enclosed grow tents, yes. The inline fan exchanges air with the surrounding room, while clip fans circulate air around leaves and through the canopy. One system does not fully replace the other.
Where should the carbon filter and inline fan go
A common layout places the carbon filter and exhaust pickup high in the tent because heat accumulates near the top. Many growers connect the filter to the fan and then route ducting out of the tent. The fan's airflow arrow and the manufacturer's mounting instructions should guide the final order.
What CFM fan do I need for my grow tent
Multiply the tent's length, width, and height in feet to find its volume. That number is a useful base CFM target for about one air exchange per minute. Then add capacity for the carbon filter, duct length, bends, lighting heat, and the surrounding room. Select from delivered airflow and component ratings, not the unrestricted fan rating alone.
Should a grow tent have negative pressure
Slight negative pressure is useful because it encourages air to enter through planned intake openings and helps keep odor from leaking through seams. Severe inward bowing is unnecessary and may indicate that the intake is too restricted or the exhaust setting is too high.
Can I vent a grow tent into the same room
It can work when the room is large enough and has its own cooling, dehumidification, or fresh-air exchange. In a small closed room, the tent may repeatedly draw in the heat and humidity it just exhausted. Monitor the room as well as the tent.
Should grow tent fans run when the lights are off
Some circulation and air exchange are usually helpful during the dark period because plant moisture continues and relative humidity often rises as temperature falls. A controller can reduce fan speed when conditions are mild and increase it when temperature or humidity changes.
Final Setup Checklist
· Calculate tent volume and choose an inline fan with realistic reserve capacity.
· Match fan, filter, and duct diameters whenever possible.
· Mount the exhaust pickup high and place the fresh-air intake low.
· Keep ducting short, open, sealed, and gently curved.
· Place one or more clip fans so leaves move gently across the canopy.
· Position the environmental sensor at canopy height away from direct airflow and radiant light.
· Confirm slight negative pressure and check lights-on and lights-off conditions.
· Revisit the layout as the canopy thickens and airflow paths change.
Build the Air Path Before the Canopy Fills In
A grow tent is easier to manage when the air has a clear route: fresh air enters low, circulation fans mix it through the plants, and warm humid air leaves high. Calculate a baseline, account for resistance, start with gentle circulation, and tune the system from actual temperature, humidity, pressure, and leaf response.
Explore Garden Supply Guys' grow tent ventilation equipment to compare inline fans, filters, ducting, controls, and compatible accessories for your setup.
Sources and Further Reading
· AC Infinity - Ventilation 101 How to Ventilate Your Grow Space
· AC Infinity - How to Calculate Required CFM for a Grow Tent
· AC Infinity - How Does the CLOUDLINE Fan Keep Your Grow Tent Cool
· University of Minnesota Extension - Small Scale Hydroponics
· Garden Supply Guys - In-Line and Bullet Fans
· Garden Supply Guys - Ventilation and Ducting