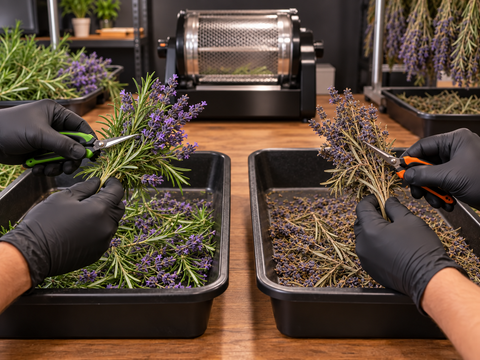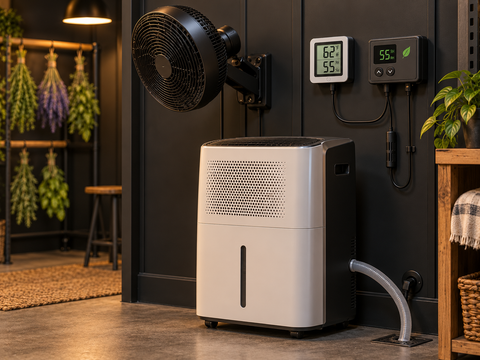
The short answer: prevent mold during harvest drying by keeping the room clean, the crop well spaced and the environment stable. For many small, dense, aromatic harvests, a practical starting point is 60–65°F (16–18°C) and 55–60% relative humidity, paired with gentle indirect airflow and enough moisture removal to prevent persistent spikes.
Those numbers are a starting range, not a universal safety threshold. Crop type, branch size, density, starting moisture, room volume and local climate all change the drying rate. Prevention comes from watching trends, finding humid pockets early and correcting the cause without blasting the harvest with dry air.
Before harvest day, install dependable environmental monitors, test your fans and blowers and confirm that your dehumidification plan can handle the first moisture-heavy days.
Food-safety note: If you are drying culinary herbs, produce or another edible crop, follow a tested crop-specific preservation method. General drying-room guidance does not replace food-safety instructions.
Why Mold Risk Rises After Harvest
Freshly cut plant material continues releasing water. That moisture moves from stems and dense flowers into the surrounding air. If the room cannot carry the moisture away, relative humidity rises and small stagnant zones can form where pieces touch, where air cannot circulate or where a cool surface causes condensation.
Mold and mildew are common names for fungal growth. The names matter less than the warning: visible fuzz, unusual discoloration, damp interiors or a musty odor mean the drying process is no longer under control. The strongest prevention plan combines five habits rather than relying on one piece of equipment.
|
Control |
What it prevents |
Best practice |
|
Measure |
Unnoticed temperature or RH drift |
Track current, high and low readings at crop height; use more than one sensor in larger rooms. |
|
Make room |
Wet contact points and stagnant pockets |
Leave space between branches, bundles and trays; do not pack racks to full visual capacity. |
|
Move air |
Humid boundary layers |
Circulate air around the room and exchange stale air without pointing a strong fan at the crop. |
|
Remove moisture |
Persistent humidity spikes |
Use ventilation or controlled dehumidification sized for the room and fresh crop load. |
|
Keep clean |
Cross-contamination |
Clean first, then disinfect tools and hard surfaces according to product directions. |
Set Up the Room Before Harvest Day
The easiest mold problem to fix is the one that never enters a loaded drying room. Prepare the space early enough to run it empty for at least 12–24 hours. This dry run reveals hot periods, overnight humidity climbs, short equipment cycles and dead-air corners while changes are still easy.
● Remove old plant debris, dust and standing water.
● Wash visible dirt from racks, trays, tools and hard surfaces before disinfecting them.
● Confirm that drains, condensate hoses and collection tanks are clean and secure.
● Place monitors at crop height, not on the floor or directly beside an equipment outlet.
● Check that fan guards, filters, exhaust paths and intake screens are clean.
● Arrange the room so every part of the harvest can be inspected without squeezing between wet branches.
Sanitation is not a substitute for environmental control, and environmental control is not a substitute for sanitation. Use both.
Control Temperature and Humidity Together
Relative humidity changes with temperature. A room can show a sharp RH rise overnight even when the absolute amount of moisture has changed very little, simply because cooler air reaches saturation sooner. That is why a useful log records temperature and RH together.
For many dense, aromatic crops, begin near 60–65°F and 55–60% RH. Avoid chasing every one-point change. Instead, investigate persistent readings above the mid-60s, repeated spikes, condensation or differences between sensors. If the outside becomes crisp within a day or two while the center remains damp, conditions may be too dry, too warm or too windy.
Map the Room, Not Just One Number
One sensor can describe one location. It cannot prove that the entire room is uniform. In a small tent or closet, place a monitor at hanging height away from the direct fan stream and dehumidifier outlet. In a larger room, place a second monitor across the room or near the densest load.
A data-logging monitor is especially useful because mold risk often develops between visits. Compare current, high and low readings at least twice daily. If two sensors disagree consistently, verify their accuracy and inspect the wetter zone.
Use Airflow Without Overdrying the Surface
Airflow should replace the humid layer surrounding the plant material with drier room air. The goal is mixed air—not moving branches. Aim circulation fans below the hanging zone or toward a wall so the air returns gently through the room. Add exhaust or fresh-air exchange when outside conditions allow it.
● Leaves and small branches should not whip or flutter continuously.
● No equipment outlet should create a noticeably faster-drying lane.
● Racks should have open space on every side, including along exterior walls.
● Correct a dead zone by changing fan placement or room layout before simply increasing fan speed.
Select circulation and exhaust equipment from the Garden Supply Guys fans and blowers collection, then position it to move air around the harvest rather than directly through it.
Use a Dehumidifier as a Controlled Tool
A dehumidifier can be valuable during the first days of drying, when a fresh harvest releases moisture quickly or when outdoor air is too humid for ventilation alone. It condenses water from the air, but it also adds some heat to the room. Watch both outputs.
Choose a unit with enough moisture-removal capacity for the room and crop load. The Active Air portable commercial dehumidifier offers digital control, automatic restart, a removable filter and continuous-drain capability for demanding spaces.
● Keep the air outlet from blowing directly on hanging material.
● Use a secure drain hose or empty the tank before it can shut the unit down.
● Clean the filter and inspect the condensate path on schedule.
● Allow room air to mix so the humidistat reads representative conditions.
● Watch for short cycling, heat gain and RH overshoot below the target zone.
Published pint-per-day ratings are measured under specified test conditions; real removal capacity changes with room temperature and humidity. Size conservatively and judge performance from the room log, not the label alone.
Load the Harvest for Even Drying
Use clean harvest drying supplies and load the room in a way that keeps every piece exposed to moving room air. More material in the same space creates more moisture and fewer clear air paths.
1. Inspect before hanging. Exclude material with visible mold, rot, pest damage or an off odor.
2. Choose branch and bundle size deliberately. Thick branches and dense bundles hold moisture longer.
3. Leave open space. Separate pieces that touch and avoid pressing racks against walls.
4. Load in stages when possible. Watch how the room responds before adding the final portion.
5. Stabilize gradually. Make one equipment change at a time, then allow the room to respond.
6. Record the setup. Note the crop load, room conditions, fan positions and dehumidifier settings.
A Twice-Daily Prevention Routine
A brief inspection morning and evening catches most problems while they are still local. Keep a simple written or digital log beside the room.
● Record current, high and low temperature and RH.
● Compare readings from multiple locations.
● Check the densest pieces, contact points, corners and the side farthest from circulation.
● Smell the room before becoming accustomed to it; investigate musty, sour or ammonia-like notes.
● Confirm that every fan is running and every exhaust path is open.
● Check dehumidifier water collection, drain flow, filter condition and heat output.
● Write down every adjustment so you can tell whether it helped.
Warning Signs and Immediate Responses
|
What you notice |
Likely cause |
Immediate response |
|
RH remains above the mid-60s |
Large wet load, weak moisture removal or poor exchange |
Increase spacing; verify exhaust and dehumidifier operation; inspect dense areas. |
|
One sensor reads much higher |
Dead-air pocket, cool wall or uneven load |
Inspect that zone; redirect circulation indirectly; move material away from the wall. |
|
Condensation on walls or equipment |
Cold surface, temperature swing or saturated air |
Protect the harvest from drips; dry the surface; stabilize temperature and moisture removal. |
|
Exterior dries very quickly |
Direct fan, heat or excessive dehumidification |
Redirect airflow; reduce heat or drying intensity; check centers before storage. |
|
Musty odor or visible fuzz |
Probable fungal growth |
Stop handling; isolate affected material; bag and discard it; clean and correct the room. |
|
Dehumidifier runs but RH climbs |
Unit undersized, icing, blocked filter, full tank or poor mixing |
Check drainage and filter; verify airflow; reduce load or add appropriate capacity. |
What to Do If You Find Mold
Do not shake, squeeze or carry visibly moldy material through the room. Disturbing it can spread spores and fragments. Pause nearby fans if needed, isolate the affected piece carefully and place it directly into a bag or closed container for disposal.
Do not rely on trimming away the visible portion. Fungal growth can extend beyond what is easy to see, especially in dense material. Do not consume or sell contaminated edible or inhaled material. When in doubt, discard it.
7. Isolate and discard the affected material without spreading debris.
8. Inspect neighboring pieces, contact points and the interior of dense samples.
9. Clean visible organic material from tools, racks and hard surfaces.
10. Disinfect suitable surfaces according to the disinfectant label; never mix cleaning chemicals.
11. Correct the environmental cause—spacing, airflow, temperature swing or inadequate moisture removal.
12. Increase monitoring frequency until readings and inspections remain stable.
For a culinary harvest, follow crop-specific extension guidance and applicable food-safety requirements. If contamination is widespread, professional testing or disposal may be the safest next step.
Common Mold-Prevention Mistakes
Adding More Fan Speed Instead of Fixing Airflow
A stronger fan can dry the outside faster while leaving hidden centers wet. Correct the circulation path and spacing first.
Trusting One Hygrometer
A single reading can miss a damp wall, crowded rack or cold corner. Larger or irregular rooms need multiple measurement points.
Letting the Dehumidifier Control the Whole Strategy
A dehumidifier removes water from the air; it cannot create space between branches, sanitize racks or fix a dead-air pocket by itself.
Making Several Changes at Once
If you change fan speed, exhaust, temperature and dehumidifier setting together, you will not know which correction worked. Make measured changes and log the response.
Sealing Material Before Moisture Equalizes
An exterior that feels dry can hide a damp center. Use multiple readiness checks and a monitored test container before moving the full harvest into storage.
Equipment Checklist
● At least one accurate thermometer/hygrometer; two or more for larger or irregular rooms
● A log with current, high and low readings
● Circulation fan positioned for indirect room mixing
● Exhaust or ventilation appropriate for the space
● Dehumidifier with suitable capacity, clean filter and safe drainage
● Clean racks, hangers or drying screens with enough spacing
● Clean gloves, tools and labeled waste bags
● Light-protective storage containers for the next stage
Frequently Asked Questions
What humidity helps prevent mold during harvest drying?
For many small, dense, aromatic harvests, 55–60% RH is a useful starting zone. Treat it as a control target rather than a guarantee. Persistent readings above the mid-60s, condensation, damp contact points or musty odors call for immediate inspection and correction.
How many hygrometers should I use?
Use at least one reliable monitor at crop height in a small, uniform space. Add another across the room, near the densest load or by a suspected problem zone in larger rooms. Avoid placing sensors directly in a fan or equipment outlet.
Should a fan point directly at the drying harvest?
No. Use gentle, continuous circulation around the material. Direct air can make the surface crisp before moisture in the center has moved outward, producing an uneven dry.
When should I turn on a dehumidifier?
Use it when ventilation and room conditions cannot keep RH within the chosen range—often during the first moisture-heavy days or humid weather. Start conservatively, watch room temperature and adjust from logged trends.
Can a dehumidifier dry the harvest too quickly?
Yes. An oversized unit, low set point or outlet aimed at the crop can overdry surfaces and create swings. Use its humidistat or an appropriate controller, keep air mixed and monitor high and low readings.
What should I do with moldy harvested material?
Isolate and discard it without shaking or spreading debris. Do not depend on removing only the visible spot, and do not consume or sell contaminated edible or inhaled material. Inspect nearby pieces, clean and disinfect the area, then correct the conditions that allowed growth.
Build a Drying Room That Warns You Early
Mold prevention is not about finding one perfect number. It is a repeatable system: clean the room, leave space, measure more than one location, move air gently, remove moisture at the rate the crop releases it and respond to trends before they become visible damage.
Prepare the room with Garden Supply Guys environmental monitors, properly positioned fans and blowers, the Active Air portable commercial dehumidifier and practical harvest drying supplies so every harvest starts with a safer, more predictable environment.
Sources and Further Reading
● Drying and Curing Herbs and Flowers (Hops, Hemp, and Everything Else!) — University of Vermont Extension Agricultural Engineering
● Preserving Food at Home: Drying — University of Minnesota Extension
https://extension.umn.edu/food/preparing/cooking-at-home/food-preservation/drying
● Clean and Disinfect Gardening Tools and Containers — University of Minnesota Extension
● In Pursuit of Optimal Quality: Cultivar-Specific Drying Approaches for Medicinal Cannabis (2024) — Plants